Using CloudFront as a Lightweight Proxy

In the last post, I explored using CloudFront Functions as a blazing fast API that ran on the edge. Since then, I've learned a lot more about CloudFront, SigV4 and Origin Access Control (OAC). This led me to some discoveries on how to use CloudFront as a lightweight proxy for S3 and Lambda. In this "loot drop", I'll detail how to use CloudFront to read and write directly to S3, create a url bookmark service and send PUT and POST requests to an IAM protected Lambda Function Url.
What is Origin Access Control?
Origin Access Control is a feature in CloudFront that allows it to perform SigV4 authenticated actions on your origin. It is available for S3 and Lambda Function URL origins and relies on resource policies to grant CloudFront access to your resources. In practice, this means you can front your origin with a custom domain and use CloudFront Functions to authorize requests. CloudFront acts as a lightweight edge caching proxy that can run code between your end users and your resources. Before a request makes it to your origin, it must pass through your CloudFront function logic.
S3 Origins
The main use of CloudFront is to front a private S3 Bucket with a global CDN to serve static websites and assets. With OAC, it's not limited to read-only access. By adding PutObject permissions on your S3 Bucket Resource policy, you can write directly to your S3 bucket through CloudFront! Here's a quick pros/cons list of using CloudFront to write to S3 over using the more traditional presigned urls.
| Pros | Cons |
|---|---|
 No need for presigned urls S3 bucket never exposed directly to end user You can limit the size of the object being written No CORS issues Uses your custom domain Supports up to 5GB objects without multiple presigned urls No cold start time No infra other than the CloudFront distribution and S3 bucket No need for presigned urls S3 bucket never exposed directly to end user You can limit the size of the object being written No CORS issues Uses your custom domain Supports up to 5GB objects without multiple presigned urls No cold start time No infra other than the CloudFront distribution and S3 bucket |
 Extra $.02+/GB data transfer cost. Extra $.02+/GB data transfer cost. |
It's better in every dimension except cost.
Warning
Adding PutObject permissions allows anyone to write to your bucket. Use a CloudFront function to authorize the user, prefix the key with the users' username and limit the size (content-length header) of the object to be written. Also scrub the query string for content like ?uploads or disallow POST requests if you don't want to allow multipart uploads.
Demo: Writing directly to S3
To demonstrate writing to S3 through CloudFront, I'll create a website that allows users to bookmark a Google search query using only CloudFront and S3. I'll persist the search query in a 0 byte S3 object with the Google search terms stored as metadata and return a url to that object. The url will redirect to Google with the original search terms from the object metadata. Since metadata comes back as headers from S3, and CloudFront Functions can access the response headers, I extract the search terms from the header and redirect the user to Google. It is deployed here and I recommend you try it. Enter some search terms and hit the resulting url.
Why not a url shortener?
You may wonder why I didn't just create a url shortener. I wanted to showcase writing to S3, but didn't want my bucket abused to store malicious links. By not allowing anyone to write bytes to the object and routing all responses through a Google search, I don't have the risks of a pastebin or url shortener. As an additional protection, I've put a lifecycle policy on the bucket to delete the written objects after 1 day.
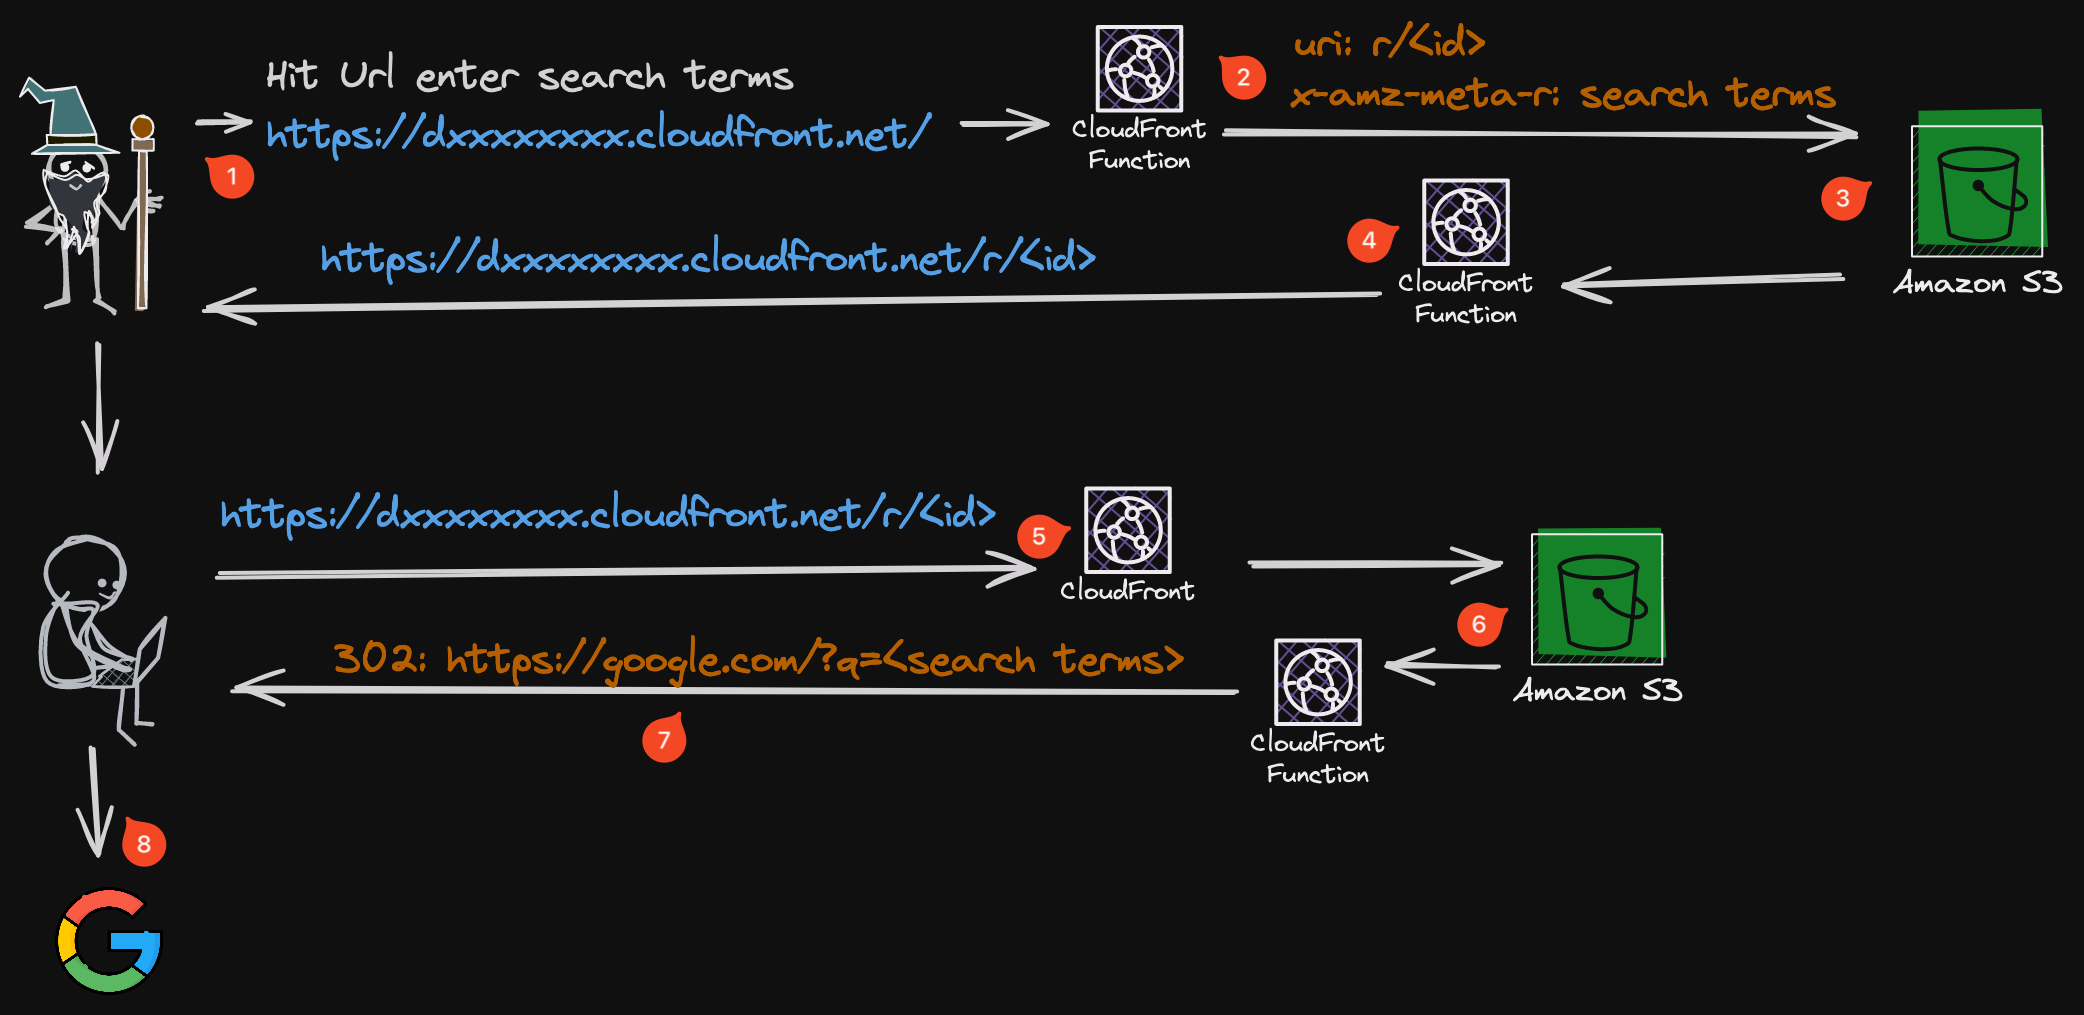
Architecture
Here's a diagram of the architecture
- User hits website, enters some search terms and the static website issues a
PUTrequest to/api?s=<search terms> - A CloudFront viewer request function checks to make sure the
content-lengthheader is0, modifies the uri to ber/<cloudfront-requestid>and sets thex-amz-meta-rheader to the search terms from the query string. - S3 writes a file with
r/<cloudfront-requestid>as the key and the search terms to thex-amz-meta-rmetadata. - CloudFront viewer response function overrides the body returned by S3 to be some json that includes the resulting cloudfront url and request id.
- Another user hits the url
- Request hits S3 unless it has been cached already
- CloudFront Viewer Response function extracts the search terms from the
x-amz-meta-rheader returned by S3 and redirects the user to Google with the search terms. - User is redirected to Google with the search terms.
The Code
There's nothing special about the code other than how simple it is. Here is the code for step 2.
function handler(event) {
  let r = event.request,
    m = r.method,
    c = event.context;
  try {
    //Verify the request is a PUT because I don't want to allow DELETE etc.
    if (m !== 'PUT') {
      throw new Error('Unsupported HTTP Method');
    }
    //Validate query parameters
    if (!r.querystring['s'] || !r.querystring['s'].value) {
      throw new Error('Missing s query parameter');
    }
    if (r.querystring['s'].value.length > 1800) {
      throw new Error('s query parameter exceeds max length');
    }
    // validate content-length is present and 0
    if (
      !r.headers['content-length'] ||
      !r.headers['content-length'].value ||
      '0' !== r.headers['content-length'].value
    ) {
      throw new Error('Content-Length header must be 0');
    }
    //Set the uri to be /r/<requestid> and set the metadata to the search terms
    r.uri = `/r/${c.requestId}`;
    r.headers['x-amz-meta-s'] = { value: r.querystring['s'].value };
    //Replace querystring to prevent user from initiating a multipart upload
    r.querystring = '';
    return r;
  } catch (e) {
    return {
      statusCode: 400,
      statusDescription: 'Bad Request',
      body: e.message,
    };
  }
}
The OAC policy applied to the S3 bucket allows the CloudFront distribution to invoke GetObject on the entire bucket, but PutObject is only allowed on the r/ prefix.
The full code is available in this GitHub repository coldstart-zero-loot-drop if you want to deploy it to your own account. The README takes you through the code and how to deploy it.
Multipart uploads
Something I learned about S3 is that the only permission required to perform a multipart upload is s3:PutObject. As long as you follow the sequence here to perform multipart uploads. You you can upload files up to 5TB from your website (but 5TB will cost $100 in data transfer fees). Using curl I was able to initiate a multipart upload through my CloudFront distribution by issuing a POST /Key+/?uploads request followed by a series of PUT /Key+?partNumber=PartNumber&uploadId=UploadId requests and finally completing the upload with a POST /Key+?uploadId=UploadId with a body containing details about each part I uploaded.
Tip
I'll repeat this again, it's important to scrub the query string for ?uploads or restrict to GET and PUT requests if you don't want to allow multipart uploads. They can get costly.
Browser based uploads using form POST
Uploading a file using a form POST through CloudFront is not possible without creating a presigned form. However, you can use a CloudFront function to generate the form inputs necessary to render on your static website. The two benefits of this approach are you don't need client side javascript and you can mask the S3 bucket name. I've got a working demo that allows you to upload a file of up to 2 bytes here if you want to try it. Create a file with 2 characters in it (or 1 character if your editor appends trailing newlines) and upload it. It will write the file to my S3 bucket and immediately serve it back to you and cache it on the edge.
I didn't spend the time to package this up into a deployable stack, but will if there is demand. I've included the code I use to create the presigned form here however since that is the main challenge. If you use it, be sure to change the region I've hardcoded, put some credentials in KV Store and update the KV id as appropriate. Expand the section below if you are curious how this all works.
All the fiddly bits you can't unsee, peek if you dare
- The default behavior (/*) for the CloudFront distribution is pointing to my S3 bucket with a normal OAC policy that allows
GetObjecton the entire bucket. - The CloudFront viewer request function behind the
/postAPIbehavior has access to a KV store with IAM user credentials with a policy that can performPutObjecton my S3 bucket to ther/prefix. GET and HEAD requests are allowed on this path. The POST policy embedded in the presigned form is required to have a bucket field in it. I mask the bucket name by setting bucket like this:["starts-with", "$bucket", ""]The bucket name is set from the dns name in the CloudFront origin, so it can't be tampered with by the user. - The
/postbehavior is pointing to a different S3 OAC origin on my bucket which has signing turned off so it isn't doing any SigV4. There is also a CloudFront viewer request function that is modifying the request uri to be/. This makes it so it just forwards the POST request to S3. GET/HEAD/POST/PUT/DELETE/OPTIONS are allowed on this path. - I've turned off the default root object on my CloudFront distribution because when it is on, the
POST /request in 2 above is redirected to/index.htmland the form POST fails with a 405 from S3. - S3 redirects the POST request on successful write to the
r/<requestid>path where it wrote the object, but it appends the bucket name, etag and key to the redirect request. In order to completely hide my bucket name, I have a CloudFront viewer response function on/postthat rewrites theLocationheader to strip that portion of the URL.
Lambda OAC
Now that we've done it all with S3, what about Lambda? Lambda OAC works similarly, you add a resource policy to your IAM authenticated Lambda Function URL to allow CloudFront to invoke it, and it works great for HTTP verbs like GET. But then there is this ominous message in the docs about PUT and POST requests:

I originally thought it meant PUT and POST wasn't supported, but it turns out this was just a scary way of saying you need to provide the sha256 hash of your message body before sending it through CloudFront. Since I had been playing around with SigV4, I knew the way to provide this was to add a x-amz-content-sha256 header with the hash of the message body. I tried setting that header to the sha256 hash of the message body and it worked! This is something you can modify your clients to send. If you're looking for some javascript code to calculate the header value, check out this StackOverflow post.
Tip
A takeaway here is that there is potential for using CloudFront with CloudFront Functions as a cheaper API Gateway. You can use CloudFront Functions to do authentication and run other small bits of code in front of your Lambda to reduce the number of Lambda invocations.
Deep Thoughts
- The method of storing values as metadata in a S3 object is a clever way to expose information to CloudFront functions. You can store things in metadata you have access to in the viewer request like ip address, location, username, etc and use that in your viewer response function to make decisions.
- If you want to do campaign tracking for analytics, you can write a 0 byte file to S3 with the actual url as metadata like I do in the demo and redirect the user to the actual url with a CloudFront viewer response function. No CloudFront KV Store is needed.
- I wonder what the propagation delay of CloudFront KV is? If it isn't too bad, it can be used as a circuit breaker to reject requests before they hit your Lambda origin.
- With Cognito Identity, you directly access S3 from your app and can limit a user to a prefix of an S3 bucket based on their identity id. But that isn't their username. If you want to read and write their content in a S3 bucket with their username, you can validate their authentication token using a CloudFront function, and then rewrite the request uri to contain their username.
- There is a lot of potential for uploading files directly through CloudFront. I think with a little polish, like adding drag and drop, my upload form could solve and simplify several use cases.
Conclusion
Using CloudFront OAC and CloudFront Functions enables your end users to interact with S3 and Lambda directly through your custom domain. Using CloudFront as a lightweight proxy that can run code potentially replaces API Gateway for some use cases. I hope my adventures here have inspired you to see how you can incorporate these ideas into your own projects. If you have any questions or comments, feel free to reach out to me on Twitter or open an issue on the GitHub repository.
Further Reading
- When I was originally approaching the upload to S3 problem, I found Luciano Mammino's blog about presigned urls to be extremely helpful. I ended up not using presigned urls except for form POSTs, but it was a great resource. My way works around the CORs issue he mentions.
- Read all about SigV4 signing here But if you need to do it in a CloudFront Function for some reason and the code I've shared isn't enough, reach out. I've implemented code that can do presigned PUTs etc. too.
- This blog post about patterns for uploading to S3 shows some of the precursors and alternatives to what I'm doing.